
You wake up in Crown Point to find droppings inside a kitchen drawer, even though the yard is tidy and the fall cleanup was thorough. The problem usually isn't housekeeping. A mouse, rat, raccoon, wasp, or bat may have used a small weakness in the building envelope, then followed warmth, food, or shelter inside.
Pest control exclusion addresses that weakness before repeated treatments become the routine. For homeowners and businesses searching for pest control near me, pest control in Crown Point, IN, or an exterminator near me, The Green Advantage approaches the property as a system. The work involves finding entry points, choosing materials that can withstand local weather and pest pressure, and creating a maintenance plan that keeps pests outside.
Why Exclusion Matters for Crown Point Homes
A clean home can still have an open pest pathway. In an older Crown Point ranch, a loose soffit panel may connect directly to an attic void. In a commercial building, an unsealed utility penetration can lead from the exterior wall into a storage or service area. Pests don't need a neglected yard if the structure provides a reliable route indoors.
Exclusion is prevention built around building diagnostics. Technicians map cracks, vents, roofline joints, doors, windows, pipes, and utility penetrations against the size and behavior of the pest involved. Cornell's New York State Integrated Pest Management materials describe exclusion as a long-established prevention strategy that was promoted in the early 1900s, later overshadowed by expanding synthetic pesticide use, and revived as indoor pesticide restrictions made prevention more important in practical pest management (Cornell NYSIPM history of pest exclusion).
Northwest Indiana weather makes quick repairs unreliable. Lake-effect cold, freeze-thaw cycles, wind, and an aging housing stock place repeated stress on exterior seals. A rushed bead of silicone can split, latex caulk can peel from masonry, and unprotected expanding foam can crumble or become an inviting target for rodents.
Exclusion is different from extermination
A trap or treatment can address the pest currently inside. It won't close the route that allowed the pest to enter. Killing a mouse in a wall cavity does nothing if the opening under the garage-door trim remains accessible, and spraying wasps without closing the soffit void leaves the next colony with the same access.
Field rule: Find the route before choosing the remedy.
Government guidance emphasizes sealing exterior cracks and holes, keeping doors and windows tight-fitting, maintaining screens and weather stripping, and documenting pest-control measures as an ongoing practice rather than a one-time repair (Alberta Health Services pest-control checklist). That principle applies to residential pest control, commercial pest control, rodent control, wildlife exclusion, and prevention programs for seasonal pests.
The most useful inspection starts before anyone opens a tube of sealant. Walk the entire structure, identify every penetration, note the substrate and pest evidence, then rank repairs by access, durability, and risk. That sequence prevents cosmetic work that looks complete from the ground but leaves the building vulnerable above the ceiling, behind the garage, or along the foundation.
Walking the Outside of Your Property
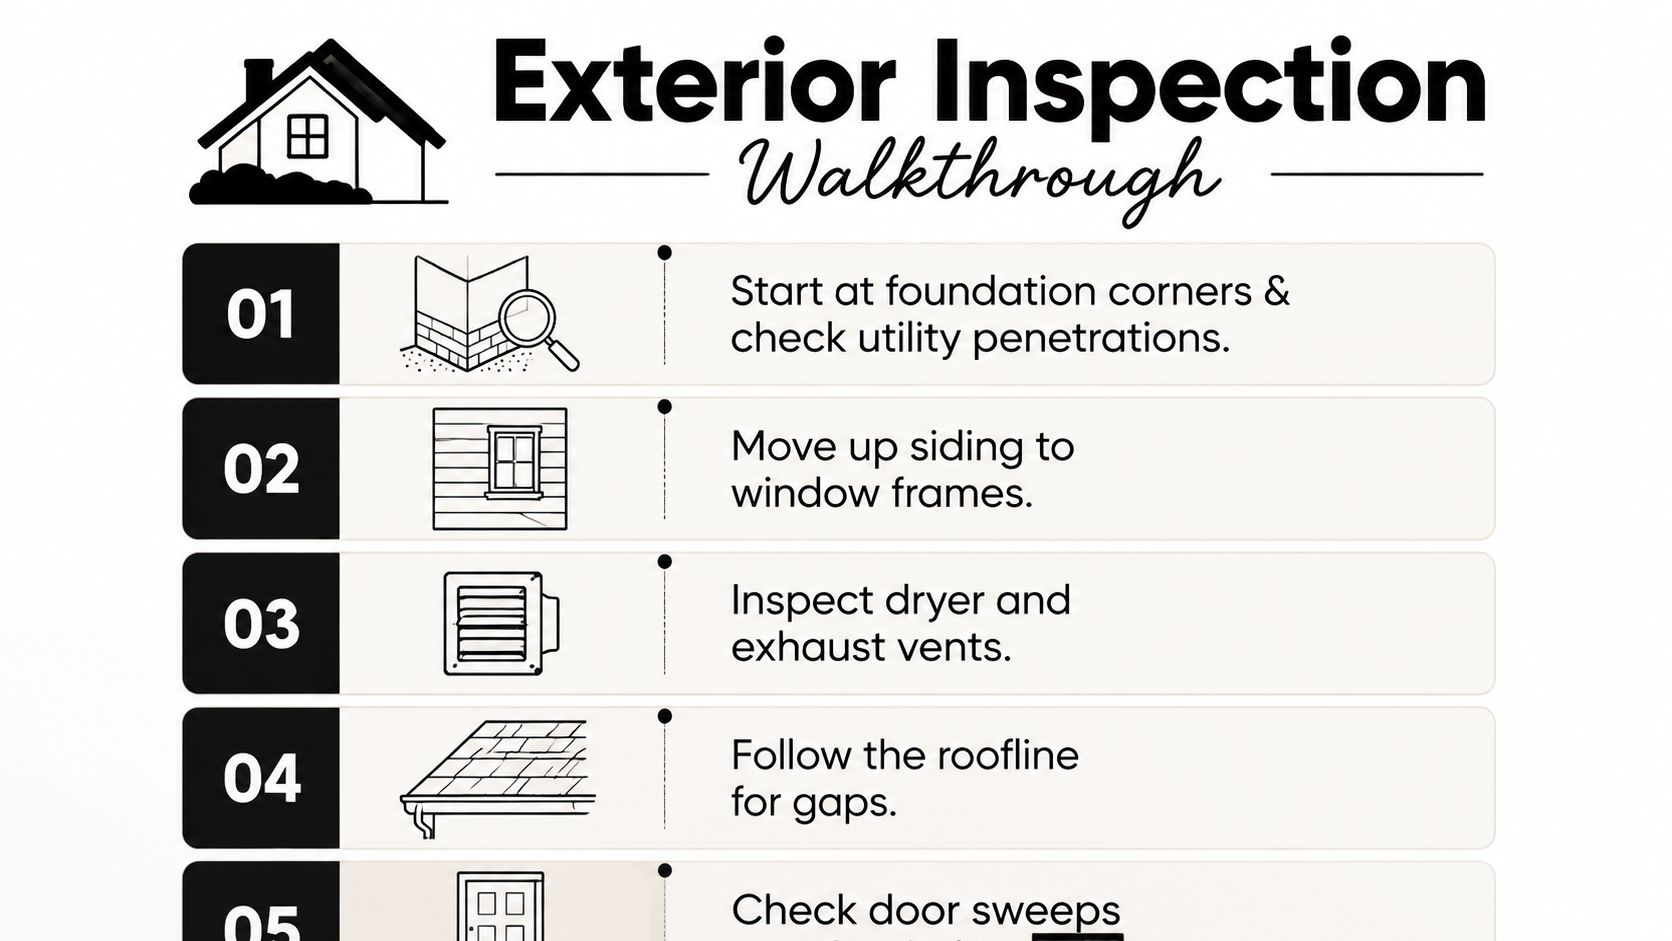
A proper exterior inspection follows the building in a deliberate order. Start low, move upward, then finish at doors and attached structures. A flashlight, inspection mirror, notepad, and phone camera reveal more than a quick glance from the driveway.
Begin at the foundation
Check foundation corners, basement windows, the rim joist, and every place a pipe, cable, or wire enters the structure. The University of Kentucky identifies utility openings at foundations and siding as common access points for rodents, ants, spiders, and yellowjackets (University of Kentucky guidance on sealing utility openings).
Look for daylight at the basement rim joist, rust trails, loose mortar, cracked parging, and openings wider than a dime. Mice can enter gaps as small as 1/4 inch, while rats can use openings as small as 1/2 inch (University of Nebraska rodent-entry guidance). A tidy foundation bed doesn't prove the envelope is tight.
Move upward across siding and windows
Follow siding seams to window frames, corner trim, hose bibs, and dryer or exhaust vents. Inspect the vent flap for warping, missing screens, and lint buildup. Gnaw marks on plastic conduit or damaged vent covers indicate that a soft component may need reinforcement, not another layer of caulk.
Check brick mortar above grade, especially where an older addition meets the original wall. Freeze-thaw movement can open joints that look insignificant until insects or rodents find them.
Finish at rooflines, doors, and attachments
Use the flashlight and mirror to inspect soffits, fascia, gable vents, chimney caps, and roofline transitions. Aluminum soffit panels can pull loose during annual windstorms, creating concealed access into attic spaces. Deck ledgers, pet doors, and garage trim deserve equal attention. Pet-door flaps may warp after a hard frost, leaving a gap at the bottom.
Gutter downspouts that discharge beside the foundation can keep masonry damp and draw attention to an already vulnerable area. For broader property planning, homeowners working on outdoor structures can also review this practical FenceScape Canada fencing guide, particularly where fencing, gates, and building attachments meet.
A short video can help visualize the inspection sequence:
Don't rely on binoculars for close defects. Get within reach where safe, use a mirror around corners, and photograph each opening before repair. A technician's inspection is less about spotting one dramatic hole and more about documenting the complete path pests could follow.
Choosing Materials That Actually Last Outdoors
The right material depends on the pest, opening, substrate, and exposure. A seal that works around an interior backsplash may fail at a dryer vent or masonry joint after repeated temperature swings. Durable exclusion uses soft sealants only where movement and surface conditions make them appropriate, then adds metal or mesh where gnawing and pressure demand stronger protection.
EPA Indoor airPLUS guidance recommends sealing holes larger than 1/4 inch by 1/4 inch with corrosion-resistant copper or stainless steel wire mesh and installing door sweeps that touch the ground across the full door width (EPA pest-entry prevention guidance). The EPA also advises sealing entryways from outdoors or elsewhere in the building to reduce the chance of pests appearing indoors (EPA pest-control resources for residents).
Match the material to the job
Exterior polyurethane caulk handles many exposed joints because it stays flexible and bonds well to common exterior surfaces. Silicone can work in selected wet areas, but surface preparation and movement matter. Interior latex caulk belongs indoors, not on aging exterior masonry where moisture and temperature movement can pull it loose.
Copper mesh or stainless steel wool can fill small rodent openings before a finished seal is applied. They aren't a complete structural repair by themselves, and exposed steel wool can rust. Hardware cloth is better for vents, larger openings, and screens that need airflow while resisting gnawing.
Expanding foam fills irregular voids and helps hold mesh in place, but exposed foam isn't a dependable final barrier. Rodents can chew it, sunlight degrades it, and foam placed where it traps moisture can contribute to sheathing damage. Sheet metal flashing and metal collars are the stronger choice around persistent gnaw points, roof transitions, and larger wildlife breaches.
| Material | Best Location | Stops |
|---|---|---|
| Exterior polyurethane caulk | Masonry joints, trim seams, small exterior cracks | Small insect and air pathways |
| Silicone | Selected wet, clean, stable joints | Moisture-associated gaps |
| Copper mesh or stainless steel wool | Small rodent openings beneath a finished seal | Mice and small rodents |
| Hardware cloth | Vents, crawlspace openings, larger screened penetrations | Rodents, birds, and insects |
| Expanding foam | Irregular voids behind a durable surface barrier | Fills space, but isn't a stand-alone rodent barrier |
| Sheet metal flashing | Gnaw points, thresholds, roof and wall transitions | Rodents and wildlife |
| Concrete | Foundation defects and larger masonry repairs | Persistent structural openings |
For a useful material-focused comparison, this Miami rodent exclusion guide also helps explain why permanent barriers outperform temporary stuffing. In Crown Point, the same principle applies. The best repair is the one matched to the surface and exposure, not the one already sitting in the garage.
Stopping Rodents, Insects, Bats, Birds, and Mosquitoes
A sealed foundation gap can still leave a bat route open at the ridge, while a repaired wall crack does nothing for mosquitoes entering through torn screens. Each pest follows different building features, so exclusion has to begin with identifying the species and tracing its access route. In Northwest Indiana's aging homes, freeze-thaw movement and lake-effect cold can turn a quick patch into a one-season repair.
Rodents
Mice and rats commonly use foundation penetrations, garage thresholds, crawlspace vents, dryer exhausts, siding joints, and gaps around utility lines. Close the full pathway rather than stuffing the visible opening. Embed corrosion-resistant mesh beneath a durable exterior seal, and install sheet-metal collars where chewing has already damaged plastic or foam.
A rodent-exclusion study found that only 16 to 28 units per site met proper exclusion criteria when inspectors checked gaps at approximately 6 mm or larger. The finding shows why a building-wide inspection catches problems that isolated repairs leave behind (Journal of Integrated Pest Management rodent exclusion study). The same study reported rodent reduction exceeding 90% through maintenance-based programs at roughly $600 per structure, using standard materials and non-specialized crews. The practical lesson is to inspect first, repair the entry system, then monitor for renewed activity.
Wasps and yellowjackets
Wasps enter through uncapped conduit, soffit returns, wall cavities, and outdoor outlet boxes. Control an active nest with an appropriate treatment approach before sealing the access point. Closing the hole while insects remain inside can redirect activity into the wall or another part of the structure.
After activity is controlled, fit tight screening or caps around utility lines and soffits. Check the repair from several angles. A narrow opening at a return or uneven trim joint can keep the route active through the season.
Bats and birds
Bats require a sound chimney cap, breathable screening at gable vents, and a planned one-way exclusion device when animals are leaving. Install the device only after confirming that no bats remain inside. Fiberglass does not replace durable metal mesh, particularly where wind, moisture, or animals can pull at the material.
Bird pressure usually needs a physical deterrent matched to the ledge or structure. Bird spikes, sliding tension wire, or properly fitted netting can work when installed without slack or exposed gaps. Remove nesting incentives where permitted, and inspect roofline transitions after storms.
Mosquitoes and screened openings
Mosquito exclusion depends on intact screens and vents that still drain and breathe. Repair torn window screens, cover suitable weep openings without blocking drainage, and use 20-mesh screen at attic vents where the design permits airflow. Choose mesh for the target pest and install it before pressure rises, then support the work with sanitation and standing-water control.
An orchard trial found that 1.8 × 6 mm hail netting reduced trap catch by 94% for codling moth, 96% for apple maggot, and 56% for red-banded leafroller under low-to-moderate pressure (orchard exclusion trial). The result does not make orchard netting a direct home mosquito solution, but it demonstrates why opening size and installation quality matter.
| Pest | Entry Concern | Primary Exclusion Fix |
|---|---|---|
| Mouse | Small foundation and utility gaps | Corrosion-resistant mesh, metal reinforcement, and durable seal |
| Rat | Larger gnawable openings | Hardware cloth, metal collars, and reinforced vent repairs |
| Wasp or yellowjacket | Conduit, soffit, and wall access | Treat active nest, then cap or screen openings |
| Bat | Roof, chimney, or vent defects | Chimney caps, breathable mesh, and one-way exclusion |
| Bird | Ledges, vents, and sheltered structures | Spikes, tension wire, or fitted netting |
| Mosquito | Torn screens and vent defects | Repaired screens and airflow-compatible screening |
For prevention-first rodent work, The Green Advantage's eco-friendly rodent control service can be considered alongside structural repairs, monitoring, and sanitation.
A Seasonal Maintenance Rhythm for Northwest Indiana
Exclusion lasts longer when inspections follow weather triggers instead of an arbitrary calendar. Crown Point homes shift as snowmelt exposes foundation defects, spring rain stresses seals, summer heat dries wood, and winter cold drives rodents toward sheltered interior spaces.
Tie each inspection to a familiar task
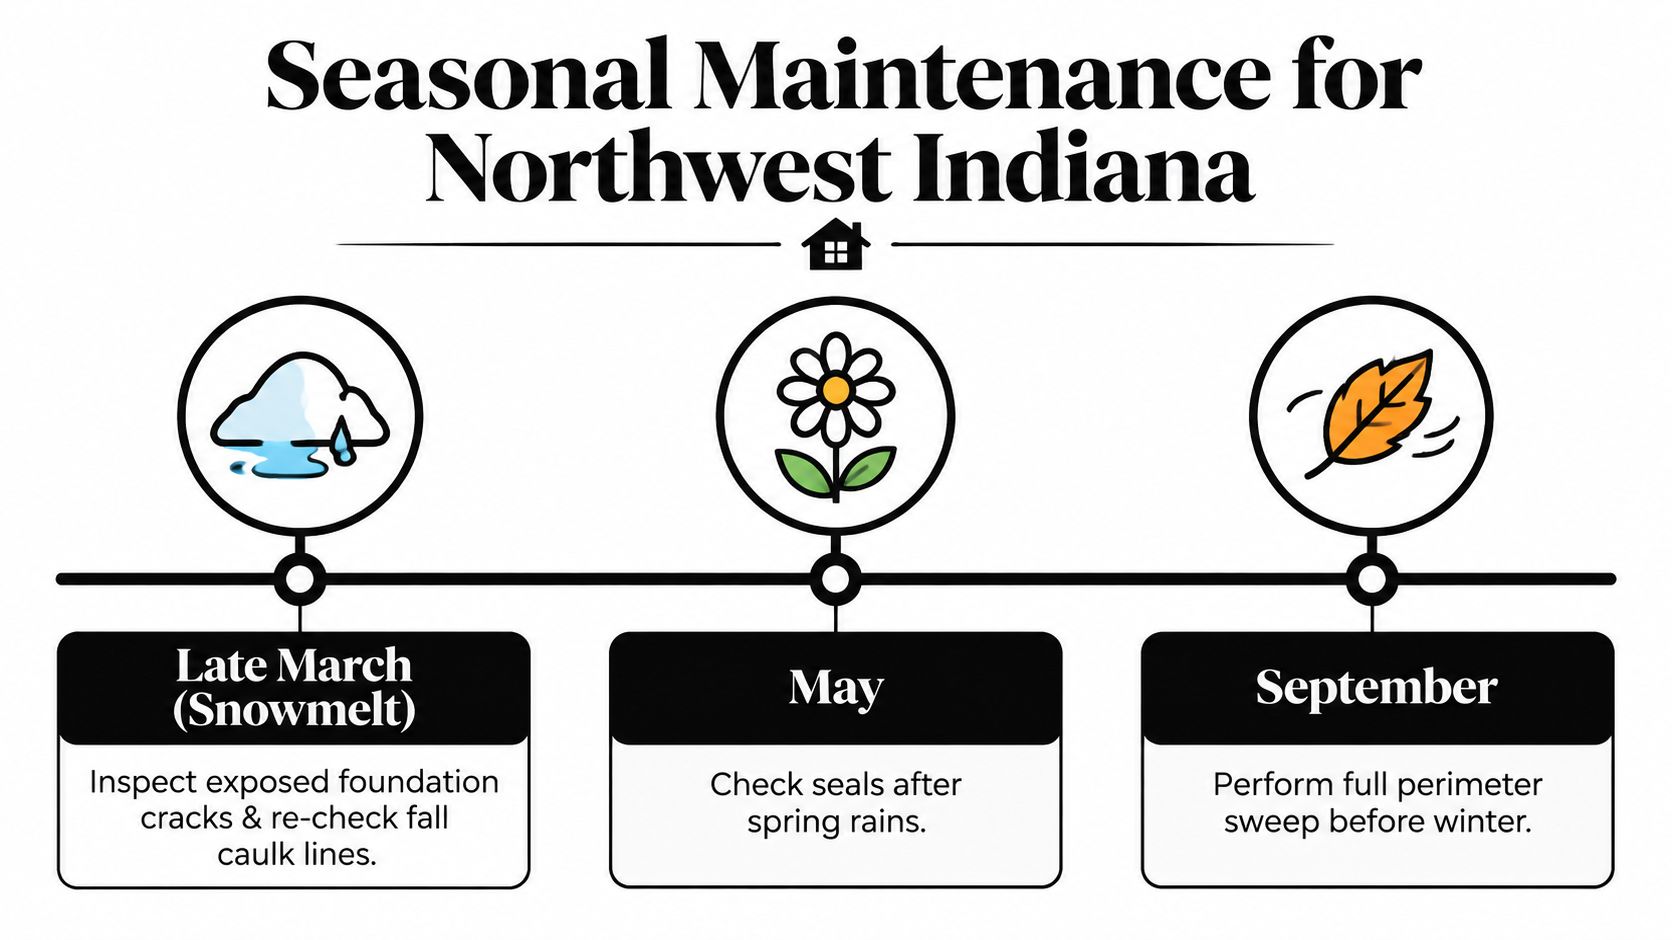
In late March, walk the perimeter after snowmelt and re-check foundation cracks and the caulk lines installed before winter. In May, inspect soffits, gutters, and utility penetrations after the first warm rains, looking for wasp activity, damp joints, and fresh chew marks.
July is a useful time to test garage seals and door sweeps. Heat and drying can warp wood and pull thresholds out of alignment. In September, complete a full exterior sweep before rodents seek indoor harborage, with special attention to crawlspace vents, garage corners, and roofline transitions.
After a deep January freeze, inspect attic penetrations and pipe stacks. Temperature movement can shift collars, seals, and surrounding materials. Each check takes roughly ten minutes, a flashlight, and a phone camera. Keep the habit attached to trash day, mowing, or another task you already do.
Keep a repair record
Photograph the same corners each time. The record shows whether a crack is stable, whether a soffit is pulling loose again, and whether a door sweep is wearing at one end. It also gives a pest professional useful history when recurring seasonal issues need more than a single treatment.
A maintenance rhythm won't replace professional preventative pest treatments, ant control, termite control, mosquito control, or wildlife work when those services are needed. It does reduce the chance that a small structural change remains unnoticed until pests establish themselves indoors.
Cost, Time, and When to Call the Pros
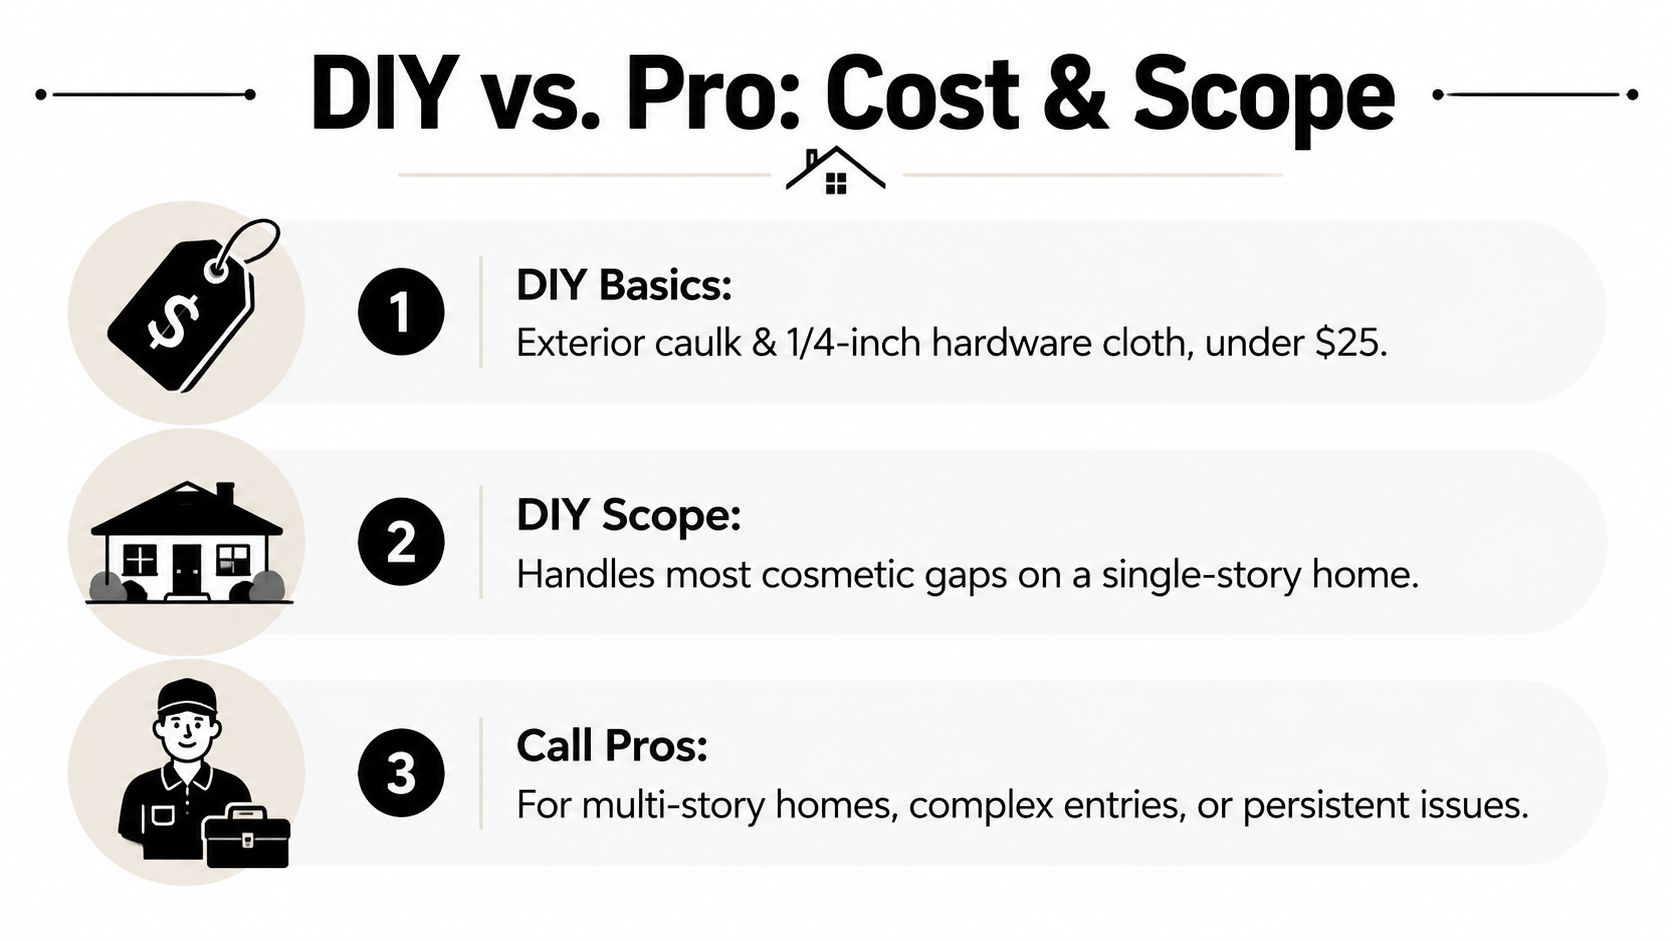
DIY exclusion makes sense when the opening is visible, reachable, and limited to a minor repair. An exterior polyurethane caulk and a roll of 1/4-inch hardware cloth can cost under $25 for basic materials on a single-story home. A skilled homeowner may spend three to five hours completing a full sweep of the foundation, soffits, vents, and garage over a weekend.
Those numbers don't make every repair a DIY project. A rotted door threshold may require carpentry, a chimney cap may require safe roof access, and a damaged gable vent may need a properly sized replacement rather than a patch. A raccoon-sized breach can involve sheathing replacement, insulation removal, or wildlife-exclusion sequencing.
Use a practical decision test
Call a professional when the work involves roofline access above single-story height, chimney crown repairs, structural damage, active wildlife, or a recurring opening you've already sealed twice. Repeated failure usually means the repair addressed the visible symptom but missed movement, moisture, hidden damage, or a second entry point.
A professional inspection also creates a better repair sequence. The Green Advantage's inspection takes about ninety minutes and produces a written priority list, allowing homeowners to phase repairs instead of guessing. That approach is useful for landlords, property managers, homebuyers, and businesses that need to distinguish urgent access points from lower-priority maintenance.
Budget wisely: Spend first on openings that connect directly to occupied areas, food storage, attics, crawlspaces, and commercial service spaces. Cosmetic cracks can wait when a garage threshold or utility penetration remains open.
The goal isn't to sell a larger repair than the building needs. It's to identify the source of recurring pest activity, select materials that match the exposure, and combine exclusion with treatment or monitoring when pests are already established.
Schedule Your Exclusion Inspection in Crown Point
A useful inspection should produce more than a verbal assurance that the property looks fine. The technician should arrive within a stated time window, walk the exterior perimeter, check accessible attic and crawlspace areas, photograph findings, and provide a written estimate organized by urgency.
Homeowners should secure pets, clear the attic access, and prepare notes about droppings, scratching, nest locations, damaged screens, or dates when activity appeared. A recent photo of a hole or pest can help, but it doesn't replace a full envelope inspection. For preparation ideas, use this practical pest control inspection checklist.
Prioritize the property, not the panic
A family home may need immediate attention at a garage threshold or kitchen-adjacent utility entry. A multifamily building may require a floor-by-floor review of shared penetrations, exterior doors, and service chases. A retail or food facility needs special attention to loading doors, waste areas, vents, and documentation. The inspection sequence should follow the building's risk and construction, not a generic list.
Crown Point scheduling often fills quickly in late summer, when mice begin seeking indoor shelter, and again in spring during swarm season. Booking two to four weeks ahead can keep the inspection on the front side of demand. That timing matters for homeowners planning repairs, landlords coordinating access, and businesses trying to avoid emergency service interruptions.
The Green Advantage serves Crown Point and nearby Northwest Indiana communities with residential and commercial pest inspections, rodent exclusion, wildlife exclusion, mosquito reduction, and integrated pest management support. Ask about the inspection fee structure when scheduling, then use the written priority list to decide which repairs to complete immediately and which can wait.
The first visit should focus on diagnostics, not pressure. Exclusion is preventive work, and a clear repair roadmap lets you act on your own timeline while addressing the openings that matter most.
The Green Advantage can inspect your Crown Point property, identify the entry points that allow rodents, insects, or wildlife inside, and recommend durable exclusion repairs alongside residential or commercial pest control. Visit The Green Advantage to schedule an inspection or request a quote, and start with a practical plan for keeping pests outside.